Getting started with Sigfox using Pycom SiPy

What is Sigfox and Sigfox network
Sigfox employs a proprietary technology that enables communication using the Industrial, Scientific and Medical ISM radio band which uses 868MHz in Europe and 902MHz in the US. It utilizes a wide-reaching signal that passes freely through solid objects, called “ultra narrowband” and requires little energy, being termed “Low-power Wide-area network (LPWAN)”. The network is based on one-hop star topology and requires a mobile operator to carry the generated traffic. The signal can also be used to easily cover large areas and to reach underground objects.
Sigfox has partnered with a number of firms in the LPWAN industry such as Texas Instruments, Silicon Labs and Axom. The ISM radio band support bidirectional communication. The existing standard for Sigfox communications supports up to 140 uplink messages a day, each of which can carry a payload of 12 Bytes (Excluding message header and transmission information) and up to 4 downlink messages per day, each of which can carry a payload of 8 Bytes.
Source: Sigfox - Wikipedia
Is there coverage in the area where I’m located?
You can check global Sigfox coverage on their website in the coverage section. In general most of the western Europe, America and Australia is covered.
How much does the service cost?
This is not easy to say. It will depend on your location, amount of transferred messages and amount of Sigfox devices you have. In general it should be something between €0.1 - €1 per device per month. Many of the current Sigfox devices include 1 year free subscription to the Sigfox network worldwide. Pycom SiPy also have it included.
What is Pycom SiPy?
Pycom SiPy is a €30 - €35 MicroPython enabled micro controller with these specifications:
- Espressif ESP32 chipset
- Dual processor + WiFi radio System on Chip.
- Network processor handles the WiFi connectivity and the IPv6 stack
- Main processor is entirely free to run the user application
- An extra ULP-coprocessor that can monitor GPIOs, the ADC channels and control most of the internal peripherals during deep-sleep mode while only consuming 25uA
Interfaces
- 2 x UART, 2 x SPI, I2C, I2S, micro SD card
- Analog channels: 8x12 bit ADCs
- Timers: 4x16 bit with PWM and input capture
- DMA on all peripherals
- GPIO: Up to 24
Security and certifications
- SSL/TLS support
- WPA Enterprise security
- AES encryption engine
Memory
- RAM: 512kb
- Flash Memory: 4MB
- GPIO: Upto 24
- Hardware floating point acceleration
- Python multi-threading
Sigfox specifiction
- TI CC1125NarrowbandTransceiver
- Class 0 device. Maximum Tx power:
- +14dBm(Europe)
- +22dBm (America)
- +22dBm (Australia and New Zealand)
- Node range: Up to 50km
Verify that it’s working without the Expansion Board
When I first ordered Pycom SiPy I didn’t include Expansion Board 2.0 in the order. This was a mistake but you can still verify if the board works. Connect 5V to 5V pin (or 3.3V to 3.3V pin) and Ground to GND pin. The device will start to power up. Within a few seconds you should be able to see sipy-wlan-XXXX wireless network. Connect to the network with these credentials:
- ESSID: sipy-wlan-XXXX
- PSK: www.pycom.io
You should get IP address from the 192.168.4.0/24 network range. Now try to telnet to 192.168.4.1 with these credentials:
- Login: micro
- Password: python
After logging-in you should see MicroPython command line.
$ telnet 192.168.4.1
Trying 192.168.4.1...
Connected to 192.168.4.1.
Escape character is '^]'.
MicroPython v1.8.6-556-g989d5ac9 on 2017-03-30; SiPy with ESP32
Login as: micro
Password:
Login succeeded!
Type "help()" for more information.

>>>
Sigfox won’t work at this moment because the board needs firmware upgrade which also registers it to Pycom:
>>> import os
>>> os.uname().release
'1.6.3.b2'

>>> from network import Sigfox
>>> import binascii
>>> sigfox = Sigfox(mode=Sigfox.SIGFOX, rcz=Sigfox.RCZ1)
>>> print(binascii.hexlify(sigfox.id()))
b'ffffffff'
>>> print(binascii.hexlify(sigfox.pac()))
b'ffffffffffffffff'
There is also FTP server running on the board. You can log-in with these credentials:
- Login: micro
- Password: python
Connect the device to the expansion board
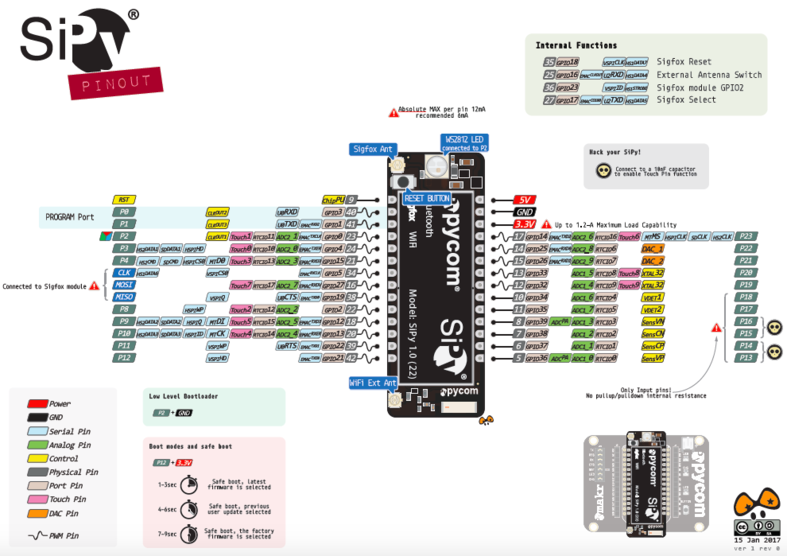
I wasn’t able to connect to the device via serial cable - I’m probably doing something wrong, here. There is a schema of the Pycom SiPy pinout on the Pycom website. Because I needed to update the firmware I connected the device to expansion board.
Update firmware
In order for Sigfox to work you’ll need to update firmware in the device. You can download Pycom updater for Linux, OS X and Windows from the Resources section of the Pycom website. After you finish the update process you should see a screen similar to this one.
┌───────────────────Success──────────────────────┐
│                                                │
│ Your device was successfully updated to        │
│ version 1.6.10.b1                              │
│                                                │
│ Please remove the wire and reset the board.    │
│                                                │
│ Sigfox: ID = 12345678, PAC = 1234567890123456  │
│                                                │
├────────────────────────────────────────────────┤
│                   <Finish>                     │
└────────────────────────────────────────────────┘
If you check the release version from MicroPython command line you should see the same version as in the Pycom updater.
>>> import os
>>> os.uname().release
'1.6.10.b1'
Also the Sigfox library should return correct Device ID and PAC.
>>> from network import Sigfox
>>> import binascii
>>> sigfox = Sigfox(mode=Sigfox.SIGFOX, rcz=Sigfox.RCZ1)
>>> print(binascii.hexlify(sigfox.id()))
b'12345678'
>>> print(binascii.hexlify(sigfox.pac()))
b'1234567890123456'
Activate device on Sigfox network
Before you start tinkering with Sigfox connection on you Pycom SiPy device you’ll need to register it to Sigfox network. This is described in Pycom documentation. You’ll need your Device ID and PAC number. Open Sigfox activation page in your browser and follow the instructions. After successfull registration to Sigfox portal you should see your device in the device list.
Configure callbacks
Open Sigfox portal, log-in and click on Device -> select device -> Callbacks -> New -> Custom callback. Add your custom callback. Here is an example:
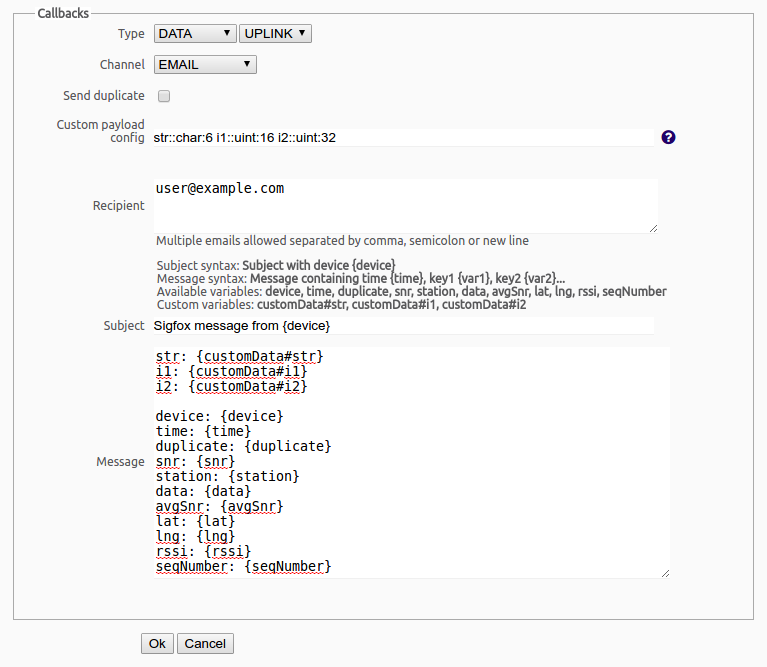
You can also configure the callbacks much simplier like this:
- Type: DATA UPLINK
- Channel: EMAIL
- Custom payload config: str::char:12
- Recipient: user@example.com
- Subject: Sigfox message from {device}
- Message: string: {customData#str}
Send your first message over Sigfox network
Messages in Sigfox network are limited to 12 bytes for outgoing messages and 8 bytes for incoming messages. In this example we’ll send an array consisting of [1, 2, 3, 4, 5, 6, 7, 8, 9, 10, 11, 12] numbers.
>>> import socket
>>> from network import Sigfox
>>> sigfox = Sigfox(mode=Sigfox.SIGFOX, rcz=Sigfox.RCZ1)
>>> s = socket.socket(socket.AF_SIGFOX, socket.SOCK_RAW)
>>> s.setblocking(True)
>>> s.setsockopt(socket.SOL_SIGFOX, socket.SO_RX, False)
>>> s.send(bytes([1, 2, 3, 4, 5, 6, 7, 8, 9, 10, 11, 12]))
12
You can also send text messages:
>>> s.send('test12345678')
12
Immediately you’ll receive an email notification configured in the callbacks section. This example is using the simplier callback with just a string translation.
Date: Mon, 17 Apr 2017 14:00:00 +0200 (CEST)
From: SIGFOX <backend-noreply@sigfox.com>
To: user@example.com

string: test12345678
Change WiFi settings
Add this code to /flash/boot.py using the internal FTP server running on Pycom SiPy on 192.168.4.1:
import network

wlan = network.WLAN()
wlan.init(mode=network.WLAN.AP, ssid='my-new-essid', auth=(network.WLAN.WPA2,'my-new-passphrase'), channel=7, antenna=network.WLAN.INT_ANT)
More information about WLAN settings are described in network.WLAN section of the documentation.
Change telnet and FTP login credentials
Add this code to /flash/boot.py using the internal FTP server running on Pycom SiPy on 192.168.4.1:
import network

server = network.Server()
server.deinit()
server.init(login=('user', 'password'), timeout=600)
More information about telnet and FTP settings are described in network.server section of the documentation.